

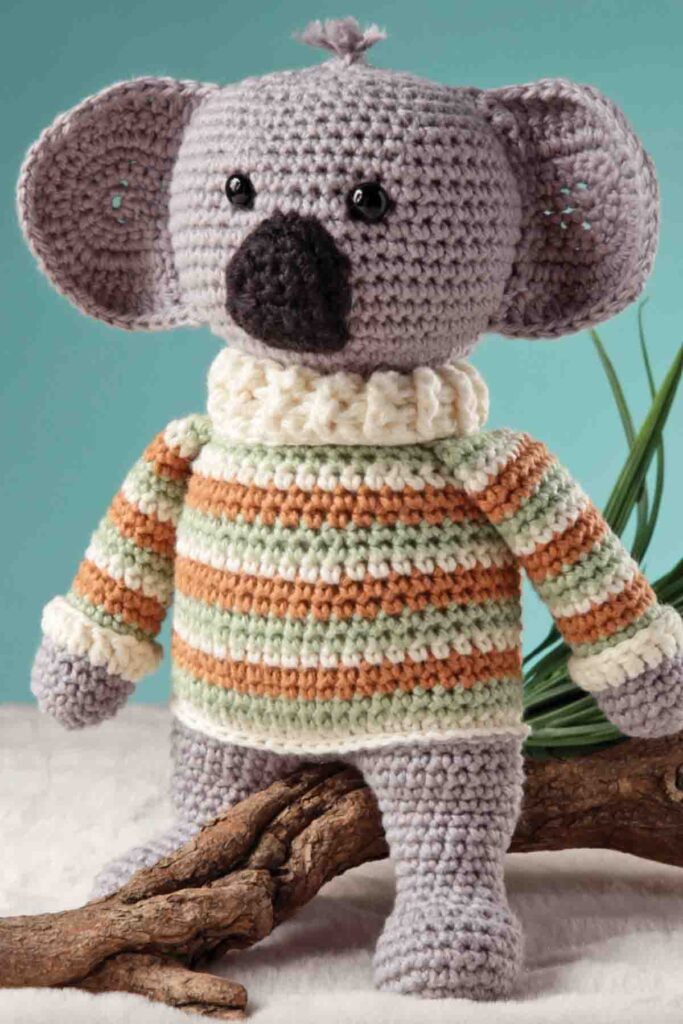
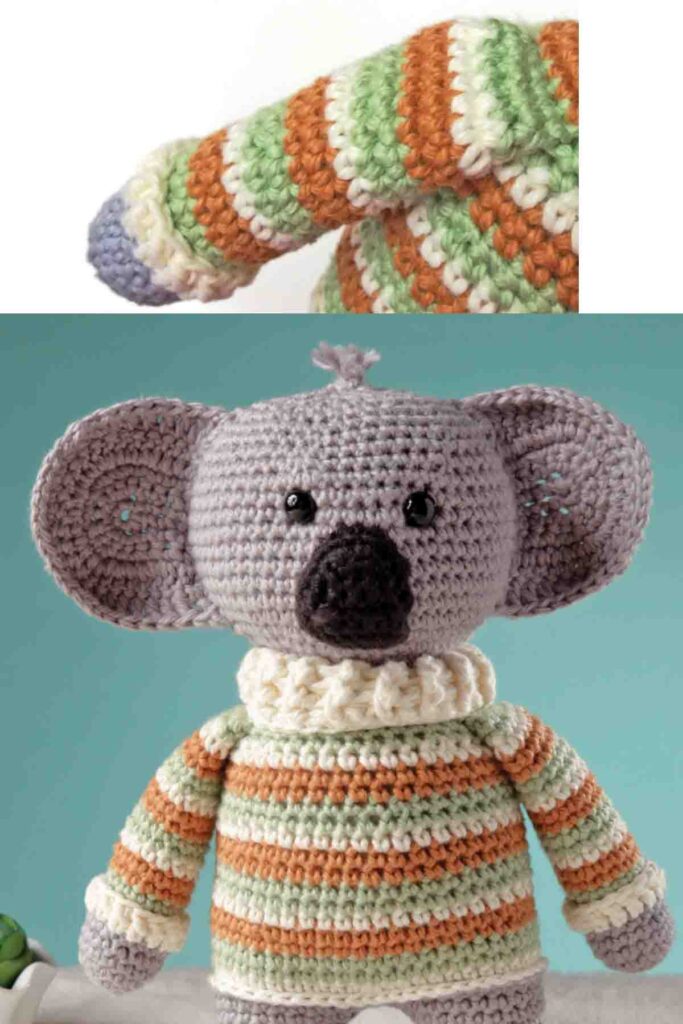
Learn how to crochet Spencer the Koala with this intermediate-level pattern!
This adorable amigurumi koala stands about 9 inches (23 cm) tall and features a cozy cowl, striped arms, and a charming personality.
Whether you’re crafting it as a gift or adding it to your crochet collection, Spencer is sure to bring a smile to your face.
Follow this detailed guide to create your own cuddly koala companion.
Materials Needed
- Yarn: Worsted weight (#4 medium)
- Shown here: Willow Yarns Meadow (100% cotton; 115 yds [105 m]/1.75 oz [50 g]):
- 0019 Pebble (A)
- 0002 Cream (B)
- 0007 Brush (C)
- 0004 Nest (D)
- 0020 Black (E)
- 1 ball of each color
- Shown here: Willow Yarns Meadow (100% cotton; 115 yds [105 m]/1.75 oz [50 g]):
- Hook: Size US C (2.75 mm). Adjust hook size as necessary to obtain the correct gauge.
- Notions:
- Yarn needle
- Two 10-mm safety eyes
- Polyester fiberfill
- Stitch markers
Measurements
- About 9″ (23 cm) tall
Gauge
- 24 single crochets (sc) and 24 rows = 4″ (10 cm)
Special Notes
- When working within the pattern, use the invisible single crochet two together (sc2tog) instead of the standard single crochet two together to create a less-visible decrease. [Link to technique tutorial here if available].
- Unless otherwise specified, do not cut yarn when changing colors; carry the unused color along the inside of the work and change colors in the last stitch of each round.
Pattern Instructions
Arms (Make 2)
Rnd 1 (RS): With A, create a magic ring, 6 sc in ring; do not join – 6 sc. Place a marker to indicate the beginning of the round.
Note: Loop a short piece of yarn around any stitch to mark Rnd 1 as the right side (RS). Stuff lightly with polyester fiberfill as you work, leaving the top ½” (1.5 cm) unstuffed. Move the stitch marker up with each round.
Rnd 2: 2 sc in each sc around – 12 sc.
Rnd 3: (Sc in next 3 sts, 2 sc in next sc) around – 15 sc.
Rnds 4-6: Sc in each sc around.
Cut A and weave in ends as you work along. Join B.
Rnd 7: Working in back loops only (blo), sc in each sc around – 15 sc.
Rnds 8-9: Join C, sc in each sc around. Drop C.
Rnds 10-11: Join D, sc in each sc around. Drop D. Change to B.
Rnd 12: Sc in each sc around. Change to C.
Rnds 13-22: Repeat Rnds 8-12 twice more, then Rnds 8-9 once more, ending with C.
Rnd 23: (Sc in next 3 sts, sc2tog) around – 12 sc.
Rnd 24: Sc in each st around; join with slip stitch (sl st) to first sc. Fasten off.
Arm Cuffs
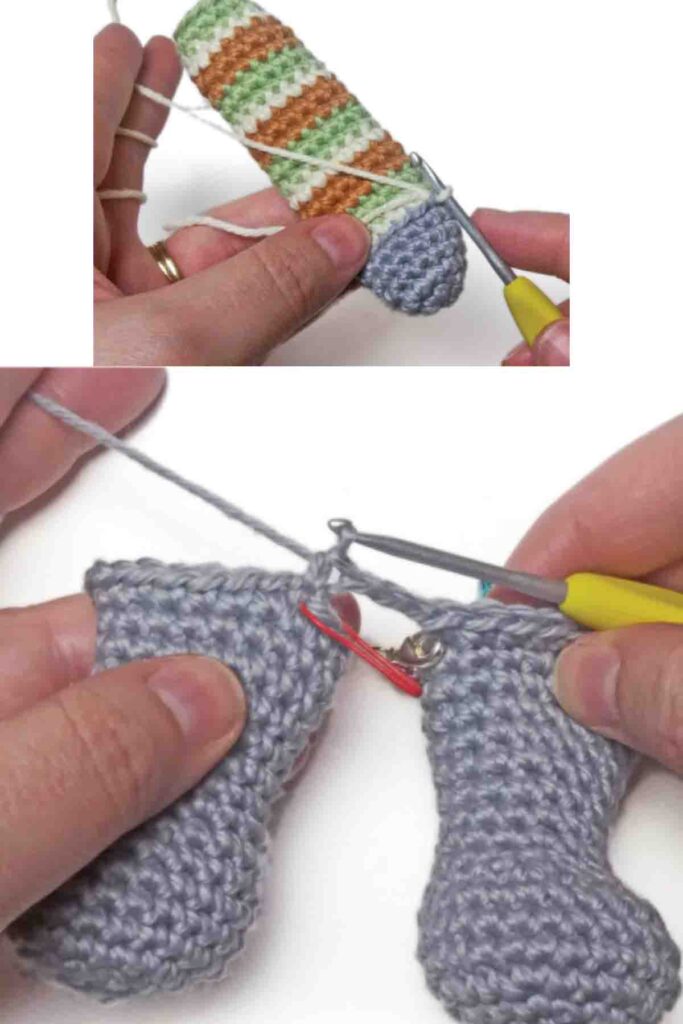
Rnd 1 (RS): Join B in the exposed front loop of Rnd 7 of the arm (see Fig. 1), ch 3 (counts as dc), dc in each loop around; join with sl st to first dc – 15 dc.
Fasten off. Roll the cuff toward the striped sleeve.
[Insert Fig. 1 here]
Foot & Leg (Make 2)
Rnd 1 (RS): With A, create a magic ring, 6 sc in ring; do not join – 6 sc. Place a marker to indicate the beginning of the round.
Note: Loop a short piece of yarn around any stitch to mark Rnd 1 as the right side. Stuff firmly with polyester fiberfill as you make each leg.
Rnd 2: 2 sc in each st around – 12 sc.
Rnd 3: (Sc in next st, 2 sc in next st) around – 18 sc.
Rnd 4: (Sc in next 2 sts, 2 sc in next st) around – 24 sc.
Rnds 5-7: Sc in each st around.
Rnd 8: Sc in next 6 sts, [sc2tog] six times, sc in next 6 sts – 18 sc.
Rnd 9: (Sc in next 4 sts, sc2tog) around – 15 sc.
Rnds 10-12: Sc in each st around.
Begin stuffing with polyester fiberfill.
Rnd 13: (Sc in next 4 sts, 2 sc in next st) around – 18 sc.
Rnds 14-16: Sc in each st around.
Rnd 17: (Sc in next 5 sts, 2 sc in next st) around – 21 sc.
- For the first leg: Mark the 6th st with a marker. Fasten off.
- For the second leg: Repeat Rnds 1-17, mark the 17th st with a marker, but do not fasten off. Continue to the body.
Body
Rnd 1: Beginning with Leg 2, sc in next 17 sts, ch 3, join with sc in the marked st on Leg 1 (see Fig. 2), sc in next 20 sts, sc in next 3 chs, sc in next 4 sts on Leg 2 – 44 sc.
Note: When working in the 3 chs, mark the 2nd sc as the back middle. Move the marker up as the body pattern progresses.
Rnd 2: Sc in next 17 sts, sc in the unworked side of the next 3 chs, sc in each st around – 47 sc.
Rnd 3: Sc to the marked st, sl st to the next st, leaving the remaining sts unworked – 45 sts. Fasten off.
Rnd 4: Join B in the marked st in the back middle, ch 1, working in blo, sc in each st around, do not join – 47 sc.
Rnds 5-6: Join C, sc in each st around.
Rnd 7: Join D, sc in each sc around.
Rnd 8: Sc in next st, [sc2tog, sc in next 13 sc] three times, sc in last sc – 44 sc. Change to B.
Rnd 9: Sc in each st around. Change to C.
Rnds 10-11: Sc in each st around. Change to D.
Rnds 12-13: Sc in each st around. Change to B.
Rnd 14: Sc in each st around. Change to C.
Rnd 15: Sc in each st around.
Rnd 16: (Sc in next 9 sts, sc2tog) around – 40 sc. Change to D.
Rnds 17-18: Sc in each st around. Change to B.
Rnd 19: Sc in each st around. Change to C.
Rnd 20: (Sc in next 8 sts, sc2tog) around – 36 sts.
Note: In Rnd 21, crochet the arms in place by folding the arm opening in half and working through both the arm and body stitches simultaneously.
Rnd 21: Sc in next 10 sts, sc in next 6 sts working through the arms at the same time, sc in next 12 sts, sc in next 6 sts working through the arms at the same time, sc in next 2 sts (see Fig. 3). Change to D.
Rnd 22: (Sc in next 4 sts, sc2tog) around – 30 sc.
Rnd 23: Sc in each st around. Change to B.
Rnd 24: (Sc in next 3 sts, sc2tog) around – 24 sc.
Rnd 25: Working in blo, sc in each st around. Fasten off.
Stuff the body with polyester fiberfill.
[Insert Fig. 2 and Fig. 3 here]
Bottom Sweater Detail
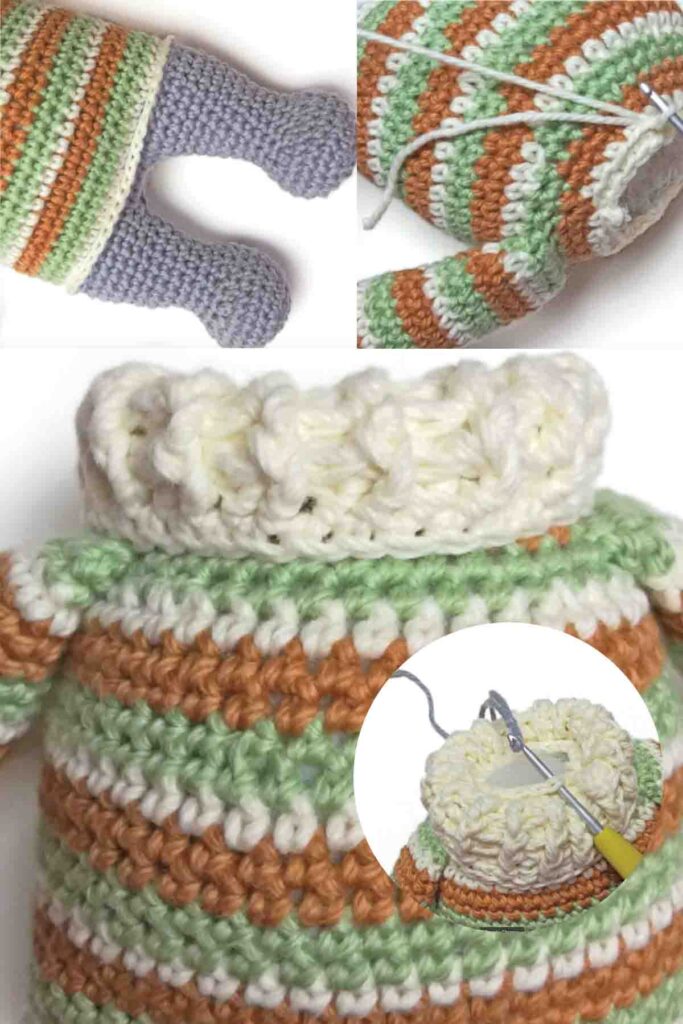
Rnd 1: Holding the koala with the head upside down, join B in the exposed front loop in the back middle of Rnd 4, ch 1, sl st in each loop; join with sl st to the first st (see Fig. 4). Fasten off.
[Insert Fig. 4 here]
Cowl
Note: The cowl is worked directly onto the body before continuing to the head.
Rnd 1: Holding the body upside down, join B in the exposed front loop on Rnd 25 (see Fig. 5), ch 2 (not a st), (dc in next 3 sts, 2 dc in next st) around; join with sl st to the first dc – 30 dc.
Rnd 2: Ch 2 (not a st), FPdc on the first st, BPdc on the next st, *FPdc on the next st, BPdc on the next st; rep from * around; join with sl st to the first FPdc.
Rnds 3-6: Ch 2 (not a st), FPdc on the first FPdc, BPdc on the next BPdc, *FPdc on the next FPdc, BPdc on the next BPdc; rep from * around; join with sl st to the first FPdc. Fasten off.
Roll down to complete the cowl (see Fig. 6).
[Insert Fig. 5 and Fig. 6 here]
Head (Continued from Body)
Rnd 26: Join A in the back middle of Rnd 25 (see Fig. 7), ch 1, sc in each sc around; do not join – 24 sc.
Rnd 27: 2 sc in each st around – 48 sc.
Rnd 28: (Sc in next 7 sts, 2 sc in next st) around – 54 sc.
Rnd 29: (Sc in next 8 sts, 2 sc in next st) around – 60 sc.
Rnds 30-38: Sc in each sc around.
Rnd 39: (Sc in next 8 sts, sc2tog) around – 54 sc.
Rnd 40: Sc in each st around.
Rnd 41: (Sc in next 7 sts, sc2tog) around – 48 sc.
Rnd 42: Sc in each st around.
Rnd 43: (Sc in next 6 sts, sc2tog) around – 42 sc.
Rnd 44: (Sc in next 5 sts, sc2tog) around – 36 sc.
Rnd 45: (Sc in next 4 sts, sc2tog) around – 30 sc.
Rnd 46: (Sc in next 3 sts, sc2tog) around – 24 sc.
Rnd 47: (Sc in next 2 sts, sc2tog) around – 18 sc.
Attach safety eyes between Rnds 35-36, about 7 sts apart. Stuff the head with polyester fiberfill.
Rnd 48: (Sc in next st, sc2tog) around, sl st in next st – 12 sc.
Fasten off, leaving a long end for sewing. Thread a yarn needle with the long end and weave through the stitches on Rnd 48. Pull tightly to close the hole and secure.
[Insert Fig. 7 here]
Nose
With E, ch 3.
Row 1 (RS): 2 sc in the 2nd ch from the hook, 2 sc in the next ch – 4 sc.
Rows 2-3: Ch 1, turn, sc in each st across, turn.
Row 4: Ch 1, turn, 2 sc in the first st, sc in the next 2 sts, 2 sc in the next st – 6 sc.
Border
Rnd 1: Ch 1, working down the side of the nose, sc in the next 4 sts, 2 sc in each st in the free loops of the next 2 chs on Row 1, working on the opposite edge using the ends of the rows as sts, sc in the next 4 sts, 2 sc in the first st of Row 4, sc in the next 4 sts, 2 sc in the last st; join with sl st to the first sc – 20 sc.
Rnd 2: Ch 1, sc in each st around; join with sl st to the first sc; fasten off, leaving a long end for sewing.
Ears (Make 2)
Row 1 (RS): With A, ch 5, sc in the 2nd ch from the hook and the next 2 chs, 5 sc in the last ch; working in the free loops of the beginning ch, sc in the next 3 chs – 11 sc.
Row 2: Ch 1, turn, sc in the next 3 sts, 2 sc in the next 5 sts, sc in the next 3 sts, turn – 16 sc.
Row 3: Ch 1, turn, sc in the next 3 sc, [sc in the next sc, 2 sc in the next sc] five times, sc in the next 3 sts – 21 sc.
Row 4: Ch 2 (not a st), turn, dc in the next 3 sc, [dc in the next 2 sts, 2 dc in the next st] five times, dc in the next 3 sc – 26 dc.
Row 5: Ch 2 (not a st), turn, dc in the next 6 dc, hdc in the next 2 dc, 2 sc in the next dc, sc in the next 3 dc, 2 sc in the next 2 dc, sc in the next 3 dc, 2 sc in the next dc, hdc in the next 2 dc, dc in the next 6 dc – 30 sts. Fasten off, leaving a long end for sewing.
Hair
Cut three strands of A, each 3″ (7.6 cm) in length. Attach to the top-center of the head and trim evenly.
Finishing
- Use the photos of the finished project as a guide for placing the pieces before sewing. Ensure the right side of all pieces is facing out.
- Sew the nose to the head below the eyes, stuffing with polyester fiberfill before closing.
- Sew the ears to each side of the head.
- Weave in any remaining ends.
Conclusion
Congratulations on completing Spencer the Koala!
This charming amigurumi makes a wonderful gift or a delightful addition to your crochet collection.
Share your finished koala with us on social media using #SpencerTheKoala.
Happy crocheting!