
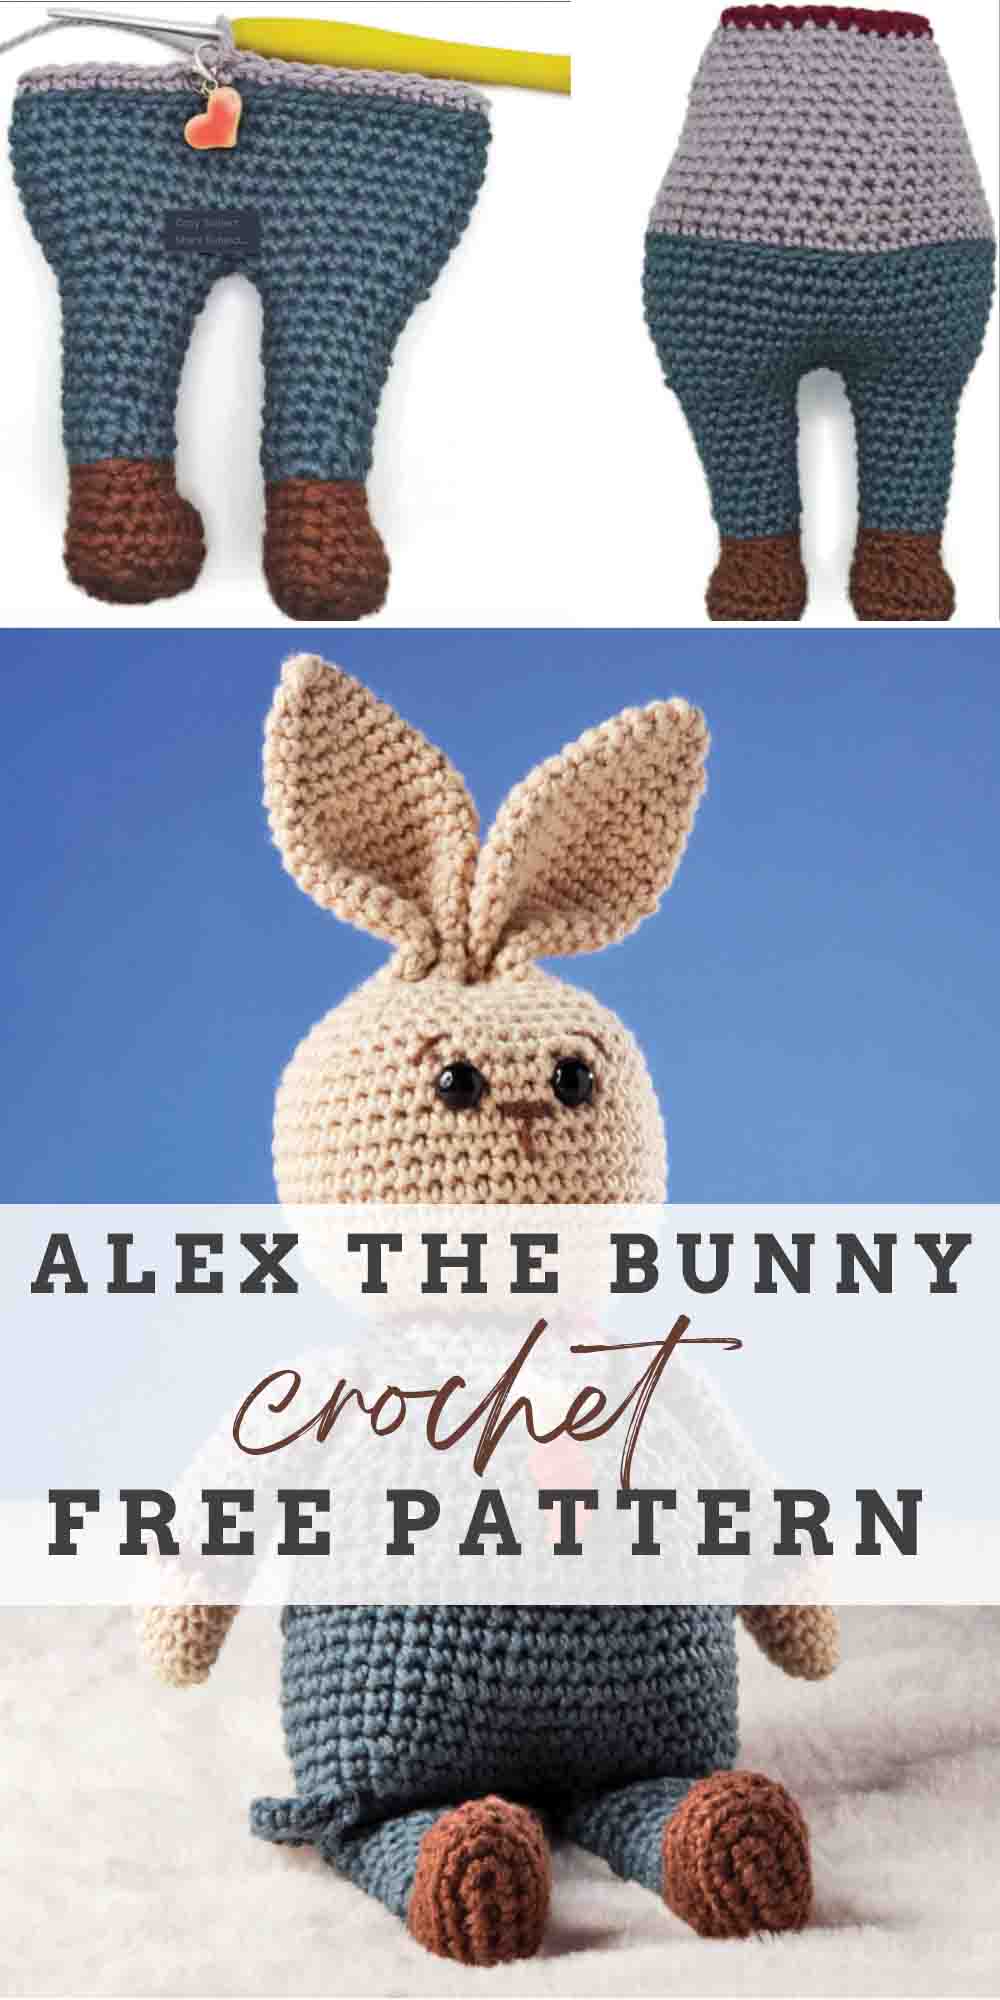
Nothing is cuter than a bunny—except maybe an amigurumi bunny!
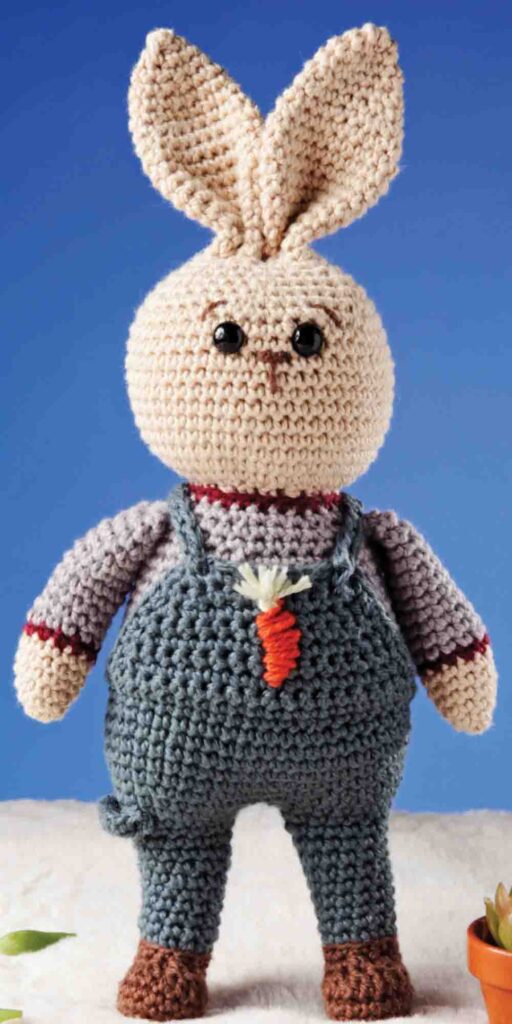
Meet Alex the Bunny, a precious carrot farmer ready to play for hours with your little cutie.
This delightful crochet project combines simple techniques with charming details to create a lovable 12-inch-tall toy.
Rated as an “easy” skill level, it’s perfect for beginners and experienced crafters alike.
In this detailed article, we’ll walk you through everything you need to know to bring Alex to life—from materials and measurements to step-by-step instructions for every part of this adorable amigurumi bunny.
Skill Level
- Easy: This project is designed for crocheters with basic skills. If you can single crochet, work in rounds, and follow a pattern, you’re ready to tackle Alex!
Materials
Yarn
- Type: Worsted weight (#4 medium)
- Recommended Yarn: Willow Yarns Meadow (100% cotton; 103 yds [95m] / 1.75 oz [50g])
- Colors:
- 0027 Bark (A) – 1 ball
- 0031 Windstorm (B) – 1 ball
- 0019 Pebble (C) – 1 ball
- 0033 Dark Cherry (D) – 1 ball
- 0003 Wheat (E) – 1 ball
- Additional: Scrap orange and green yarn for the carrot detail
Note: You can substitute any worsted weight yarn in colors of your choice, but the listed shades create Alex’s signature look.
Hook
- Size: US C (2.75mm)
Tip: Adjust the hook size if needed to match the gauge.
Notions
- Yarn needle
- Two 10-mm safety eyes
- Polyester fiberfill (for stuffing)
- Stitch markers
- Small pom-pom maker (for the tail)
Measurements
- Finished Size: Approximately 12″ (30.5 cm) tall
Alex stands tall enough to be a cuddly companion without being too bulky to handle.
Gauge
- Gauge: 24 single crochets (sc) and 24 rows = 4″ (10 cm)
Why it matters: Matching the gauge ensures your bunny is the correct size. If your stitches are too loose, try a smaller hook; if too tight, go up a size.
Special Stitches
- Single Crochet 3 Together (sc3tog):
- Pull up a loop in each of the next 3 stitches, yarn over (YO), and draw through all loops on the hook. (Counts as 1 sc.)
- Purpose: This decrease reduces 3 stitches to 1, shaping parts like the shoes.
- Note on Decreases:
- Use the “invisible single crochet two together (sc2tog)” instead of the regular sc2tog for less visible decreases. While the pattern doesn’t detail this technique, it’s a common amigurumi method—insert the hook into the front loops of the next 2 stitches, yarn over, and pull through all loops.
Pattern Notes
- Magic Ring: Most pieces start with a magic ring for a tight, closed center. Tutorials are widely available if you’re new to this technique.
- Continuous Rounds: Unless specified, work in continuous rounds (spirals) without joining. Use a stitch marker to track the start of each round.
- Stuffing: Stuff firmly with polyester fiberfill as you go, but leave the top ½” (1.5 cm) of the arms unstuffed for easier attachment.
- Color Changes: Switch colors in the last stitch of the round as indicated. Carry unused yarn inside unless instructed to cut it.
- Right Side (RS): Mark the right side with a yarn loop to help with assembly.
Instructions

Arms (Make 2)
- Rnd 1 (RS): With color E, create a magic ring, 6 sc in ring; do not join. (6 sc)
Tip: Place a stitch marker at the start and loop a piece of yarn around any stitch to mark the right side (RS). - Rnd 2: (Sc in next st, 2 sc in next st) around. (9 sc)
- Rnd 3: (Sc in next 2 sc, 2 sc in next sc) around. (12 sc)
- Rnds 4-6: Sc in each sc around. Cut color A and weave in the end as you work.
- Rnd 7: Join color B, sc in each st around.
- Rnds 8-17: Join color C, sc in each st around.
- Rnd 18: (Sc in next 4 sts, sc2tog) around. (10 sc)
Stuffing Note: Stuff lightly with fiberfill as you go, leaving the top ½” (1.5 cm) unstuffed. - Fasten off, leaving a long tail for sewing to the body.
Shoe & Leg 1
- With color A, chain 5.
- Rnd 1 (RS): Sc in 2nd ch from hook, sc in next 2 chs, 5 sc in last ch, working on the opposite side of the chain, sc in next 3 chs; join with sl st to first sc. (11 sc)
Tip: Mark the RS with a yarn loop. - Rnd 2: Ch 1, 2 sc in same st as joining, sc in next 2 sts, 2 sc in next 5 sts, sc in next 2 sts, 2 sc in last st; join with sl st to first sc. (18 sc)
- Rnd 3: Ch 1, working in back loops only (blo), sc in each st around; join with sl st to first sc. (18 sc)
- Rnd 4: Ch 1, sc in each st around; join with sl st to first sc. (18 sc)
- Rnd 5: Ch 1, sc in same st as joining, sc in next 3 sts, (sc2tog) five times, sc in next 4 sts; join with sl st to first sc. (13 sc)
- Rnd 6: Ch 1, sc in same st as joining, sc in next 4 sts, sc3tog, sc in next 5 sts; join with sl st to first sc. (11 sc)
- Rnd 7: Ch 1, sc in each st around; join with sl st to first sc. (11 sc)
- Fasten off.
- Rnd 8: Join color B in the same st as joining in the back loop, ch 1, 2 sc in same st, sc in next 10 sts; join with sl st to first sc. (12 sc)
- Rnd 9: Ch 1, sc in each st around; do not join, work in continuous rounds. Place a marker in the last stitch.
- Rnd 10: 2 sc in next st, sc in each st around. (13 sc)
- Rnd 11: Sc in each st around.
- Rnd 12: 2 sc in next st, sc in each st around. (14 sc)
- Rnds 13-15: Sc in each st around.
- Rnd 16: 2 sc in next st, sc in each st around. (15 sc)
- Rnd 17: Sc in each st around.
- Rnd 18: (Sc in next 4 sts, 2 sc in next st) around. (18 sc)
Fasten off, marking stitch 11 of Rnd 18 with a stitch marker. Stuff firmly as you go.
Shoe & Leg 2
- Repeat the instructions for Shoe & Leg 1, but do not fasten off after Rnd 18.
Body
- Rnd 1: With Leg 2 still on the hook, sc in marked stitch 11 of Leg 1 to join the legs. Sc in next 4 sts, 2 sc in next st, [sc in next 5 sts, 2 sc in next st] two more times. Then, sc in the next unworked st of Leg 2, sc in next 4 sts, 2 sc in next st, [sc in next 5 sts, 2 sc in next st] two more times; do not join. (42 sc)
- Rnd 2: Sc in each st around.
- Rnd 3: (Sc in next 6 sts, 2 sc in next st) around. (48 sc)
- Rnds 4-7: Sc in each st around.
- Rnd 8: (Sc in next 10 sts, sc2tog) around. (44 sc)
- Rnd 9: Sc in next 24 sts, sl st to next st, join color C, fasten off color B. Mark the next st with a marker. Ch 1, working in blo, sc in next 20 sts.
- Rnd 10: Work in blo in next 24 sts, join with sl st to the marked st. (This is now the new first stitch of each round.)
- Rnd 11: Ch 1, sc in each st around; do not join, work in continuous rounds. Place a marker in the last stitch.
- Rnd 12: (Sc in next 9 sts, sc2tog) around. (40 sc)
- Rnds 13-15: Sc in each st around.
- Rnd 16: (Sc in next 8 sts, sc2tog) around. (36 sc)
- Rnds 17-20: Sc in each st around.
- Rnd 21: (Sc in next 4 sts, sc2tog) around. (30 sc)
- Rnd 22: Sc in each st around.
- Rnd 23: (Sc in next 3 sts, sc2tog) around. (24 sc)
- Fasten off.
- Rnd 24: Join color D in the 4th st from the marker, move the marker to this stitch. Ch 1, sc in each st around; join with sl st to first sc. Fasten off. Stuff the body firmly.
Head (Continued from Body)
- Rnd 25: Join color E in the same st as joining, ch 1, working in blo, (sc in next 2 sts, sc2tog) around; join with sl st to first st. (18 sc)
- Rnd 26: Ch 1, (sc in next 2 sts, 2 sc in next st) around; do not join, work in continuous rounds. (24 sc)
- Rnd 27: 2 sc in each st around. (48 sc)
- Rnds 28-38: Sc in each st around.
- Rnd 39: (Sc in next 6 sts, sc2tog) around. (42 sc)
- Rnd 40: (Sc in next 5 sts, sc2tog) around. (36 sc)
- Rnd 41: (Sc in next 4 sts, sc2tog) around. (30 sc)
- Rnd 42: (Sc in next 3 sts, sc2tog) around. (24 sc)
- Rnd 43: (Sc in next 2 sts, sc2tog) around. (18 sc)
- Attach safety eyes between Rnds 36-37, about 4 stitches apart. Stuff the head firmly with fiberfill.
Ear 1
- Rnd 1: Continuing from the head, sc in next 4 sts, skip 9 sts, sc in next 5 sts; do not join. (9 sc)
- Rnd 2: (Sc in next 2 sts, 2 sc in next st) around. (12 sc)
- Rnd 3: Sc in each st around.
- Rnd 4: (Sc in next 3 sts, 2 sc in next st) around. (15 sc)
- Rnd 5: (Sc in next 4 sts, 2 sc in next st) around. (18 sc)
- Rnd 6: (Sc in next 5 sts, 2 sc in next st) around. (21 sc)
- Rnds 7-11: Sc in each st around.
- Rnd 12: (Sc in next 5 sts, sc2tog) around. (18 sc)
- Rnd 13: (Sc in next 4 sts, sc2tog) around. (15 sc)
- Rnd 14: Sc in each st around.
- Rnd 15: (Sc in next 3 sts, sc2tog) around. (12 sc)
- Rnd 16: Sc in each st around.
- Rnd 17: (Sc in next 2 sts, sc2tog) around. (9 sc)
- Rnd 18: (Sc in next st, sc2tog) around. (6 sc)
- Fasten off, leaving a long tail. Sew the top closed.
Ear 2
- Rnd 1: Join color E in the next unworked stitch of Rnd 43 of the head. Ch 1, sc in next 9 sts; do not join.
- Rnds 2-18: Repeat the instructions for Ear 1.
- After completing both ears, use a yarn needle to thread color A through Rnd 2 of each ear. Pull to gather slightly for shape, then secure and weave in ends.
Overall Flap
- Row 1 (RS): Counting from the back center exposed front loops (FLO) of the body in Rnd 10, join color B in the 14th loop. Ch 1, sc in next 19 loops. (19 sc)
- Row 2: Ch 1, turn, sc in next 19 sts.
- Row 3: Ch 1, turn, sc in first st, sc2tog, sc in next 13 sts, sc2tog, sc in last st. (17 sc)
- Row 4: Ch 1, turn, sc in each st across.
- Row 5: Ch 1, turn, sc in first st, sc2tog, sc in next 11 sts, sc2tog, sc in last st. (15 sc)
- Row 6: Ch 1, turn, sc in each st across.
- Row 7: Ch 1, turn, sc in first st, sc2tog, sc in next 9 sts, sc2tog, sc in last st. (13 sc)
- Row 8: Ch 1, turn, sc in first st, sc2tog, sc in next 7 sts, sc2tog, sc in last st. (11 sc)
- Row 9: Ch 1, turn, sc in first st, sc2tog, sc in next 5 sts, sc2tog, sc in last st. (9 sc)
Trim:
- Rnd 1: Ch 1, sc evenly in the ends of the rows of the overall flap edge, sl st in each exposed FLO around the body, sc evenly in the ends of the rows of the flap edge, sl st across the top of the flap; join with sl st to first sc. Fasten off.
Overall Straps (Make 2)
- With color B, chain 21.
- Row 1: Sc in 2nd ch from hook and in each ch across. (20 sc)
- Fasten off, leaving a long tail. Sew one strap to each corner of the overall flap, then pull the straps to the back and sew to the body on the opposite side.
Carpenter Strap
- With color B, chain 11.
- Row 1 (RS): Sc in 2nd ch from hook and in each ch across. (10 sc)
- Fasten off, leaving a long tail. Sew the strap over Rnd 1 of the body on Leg 1 to hide the fasten-off slip stitch.
Finishing
- Pom-Pom Tail: Using color E and a small pom-pom maker, create a pom-pom and attach it between the crossed overall straps.
- Face Details: With color A, stitch on the nose and eyebrows.
- Carrot Detail: Using scrap orange yarn, stitch a small carrot shape on the bunny. Add three strips of green yarn fringe on top for leaves, then trim and weave in ends.
- Assembly: Sew the arms to the body, positioning them symmetrically below the head.
Final Touches
- Weave in all remaining ends with a yarn needle.
- Check the stuffing to ensure Alex is firm yet cuddly—add more fiberfill if needed.
- Give your bunny a gentle squeeze to ensure all parts are secure.
Conclusion
Congratulations! You’ve just crafted Alex the Bunny, a charming amigurumi carrot farmer ready to bring joy to any home.
This easy-level project is a wonderful way to practice your crochet skills while creating a handmade treasure.
Whether you gift Alex to a loved one or keep him as a cozy companion, he’s sure to be a delightful addition to your collection.
Happy crocheting!


